Home Assistant
My journey with Home Assistant and the things I've learned which just might help you.
- Setup
- Setup Home Assistant on a Mini PC
- Enable HACS - Home Assistant Community Store
- Home Assistant Dynamic DNS & SSL
- Integration Notes
- Advanced Setup
Setup
Setup Home Assistant on a Mini PC
NOTE: You will need a dedicated computer to rune Home Assistant. There are other options available, but most of them require a new device. It's possible to use VirtualBox or VMware, but there are big limitations with that so I would only recommend it for trying things out. I found it easier to just dive in fully.
After investigating several options, I decided the easiest route to start out with Home Assistant was to purchase a cheap Mini PC and install HAOS on it directly, without a Hypervisor.
Finding a cheap Mini PC
I browsed https://lowcostminipcs.com/ which is a site that links to good Mini PC deals on eBay. Almost any will do, but I splurged and payed $74 for an HP Elitedesk. If you just want the basics and don't want to set anything up, you can get a Home Assistant Green device, I just knew I could get a lot more computer for a lot less price.
Installing HAOS on a Mini PC
The installation instructions Home Assistant provides for a Generic x86-64 are pretty good. If you've ever installed linux from a Live CD before then it's nothing too complicated. A few things to watch out for though:
- HAOS does not provide a live ISO for installing. You must create an Ubuntu Live USB device and then once in the Ubuntu trial environment you download the HAOS image and use Ubuntu to write that image to your disk. A little odd but it works
- You may need to modify your BIOS boot order and disable Secure Boot.
- Your computer probably won't boot after following the directions. There's a step they hide at the end to create the EFI boot entry. If you follow their instructions step-by-step you'll have to boot back into Ubuntu live mode just to run one more command.
- Once installed, you need ethernet on your first boot, but you don't need a monitor on your first boot. HAOS does a great job of launching a web interface automatically and immediately with everything you need, so don't worry about lugging a monitor around after the initial install.
- I installed HAOS over wifi where my monitors were and then moved it to my router where the ethernet was for the first boot and didn't need to bring a monitor.
Backups
One of the first things you should do is enable backups and have them copied off of your device. You'll want to think about where you can send them too. One popular option is an add-on to send them to Google Drive. In my case I have a network share available over Samba/SMB that I can send them to. Connecting to a Samba share no longer requires any add-ons, you can add it directly from Settings > System > Storage > Add Network Storage.
In Settings > System > Backups select the 3-dot menu in the upper right and select Change default backup location to change the backups to use your network share instead of being saved locally. Create a backup and check it. Unfortunately you cannot specify a sub-folder to place the backup in, so if you want it in a folder you may have to do some trickery to do that. For me, I can create a Samba share that goes straight to the desired folder.
Scheduling backups is easy in Settings > System > Backups.
Over time I will need to watch the space needed by the backups as I've heard they can grow quite large. I've also heard that the Visual Studio Code Add-on can cause backups to grow quite large, so avoiding that may be one solution.
Enable HACS - Home Assistant Community Store
Many devices you may want to control are not supported by the default included Home Assistant install. When searching online for how to connect a device with search terms like "Home Assistant [Your Device]" you will find Github repos with installation instructions. Most of these use HACS to install them, so you'll need to install HACS first.
Don't be dumb like me and try to install HACS add-ons through the native Home Assistant Add-on page. Install HACS first!
Installing HACS
Follow the most recent instructions provided by HACS: https://www.hacs.xyz/docs/use/
In summary, this will include:
- Adding the HACS Add-On Store in Settings > Add-ons within Home Assistant.
- Checking the Settings > System > Logs > Get HACS for any messages about additional manual steps (I had none)
- Restarting Home Assistant in Settings > System and press the power icon in the upper right.
- Adding the HACS Service under Settings > Devices & Services
Once installed, HACS will appear in the main Home Assistant Side menu.
Installing HACS Integrations
WARNING: HACS addons are generally not as stable as official ones. Many are abandoned & broken already, or may break over time. Go to the integration's Github Repo to report any issues or ask any questions. Also check if they are still actively maintained.
From the HACS option in the side-menu, you can browse and find additional devices/services that are supported or add the repository URL for any you find online not listed.
Some GitHub repos even provide a link that will route you straight to your Home Assistant install and add the integration when clicked.
Once an integration is Downloaded/Installed, you set it up through the usual Settings > Devices & Services page just like a native integration.
I found that after first installing HACS and downloading some custom integrations, adding them from the Devices & Services page was not working. The integration seemed to just load forever with a "Please wait, starting configuration wizard" message. Home Assistant does not provide any way to back out of this menu, so you may need to just close the app/webpage and reload it to try again. I left it for the night and in the morning had no issues. If you have this issue after any HACS integrations, just give it some time and come back to try again. A restart of Home Assistant did not resolve the issue as the restart was blocked by whatever process is being slow behind the scenes.
Home Assistant Dynamic DNS & SSL
There are numerous reasons to get an SSL certificate for your Home Assistant environment, particularly if you plan on allowing any external access.
Dynamic DNS is also extremely useful for external access so you can have a consistent domain name to use to access your HA environment even when your local ISP changes your IP address.
Dynamic DNS
For most people, I would recommend using the existing Duck DNS Add-On found in Settings > Add-Ons. In my case, I already have a separate Dynamic DNS setup for my home network. Rather than getting a SSL certificate for that DDNS provider I instead used an existing domain I own like this:
- Setup a CNAME record from newsubdomain.mywebsite.com to mysubdomain.ddnsprovider.com
SSL - Lets Encrypt
Add the Lets Encrypt Add-on found in Settings > Add-Ons.
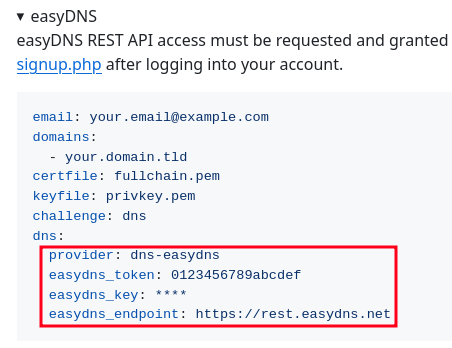
Fill out the Configuration information using the DNS challenge. You can use the http challenge if you expose your install's port to the web, but I didn't want to do that yet so DNS was a better option. You will need to read the add-ons documentation in detail to get your configuration correct. Depending on your DNS provider you need to enter different settings, and I found the Documentation to be incorrect in places.
The short version is:
- Fill out your domain and email address
- In my case, the domain would be: newsubdomain.mywebsite.com
- Find your DNS provider in the Example Configurations section of the Add-on Docs.
- Do not use the "DNS providers" section downdown for this, some of the settings are incorrect/missing.
- Copy the settings under the "dns" section and paste those into your HA add-on configuration page. Example:
-
- Search for how to get any required credentials for your specific DNS provider. Fill in those fields.
- Save the Configuration page.
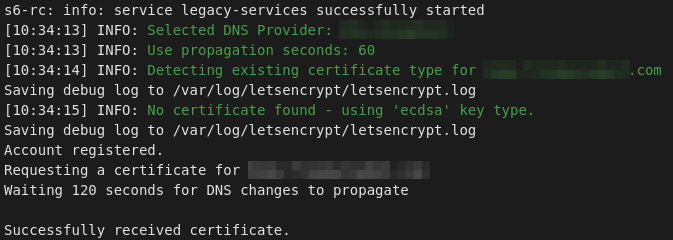
- Go to the Info page of the Add-on. and click Start.
- The Add-on will begin trying to get your SSL certificate. Switch to the Log tab to to see if it was successful or if there were any errors. It may take several minutes, there's a refresh button at the bottom to reload get any new logs.
Integration Notes
Helpful notes about configuring and using various integrations.
Tesla
You'll find several Tesla integrations available in the Settings > Devices & Services > Add Integration page. Here's a brief comparison to help you pick them:
- Tesla Fleet - Integrates with your Tesla Vehicles. Also supports Tesla Solar/Powerwall. All communication done through Tesla's cloud API. Provides only high-level solar sensors, but allows sending requests to cars. (Setup Docs)
- Tesla Powerwall - Integrates with Tesla Solar/Powerwall. All communication is done locally with your Tesla Backup Gateway. Provides much more fine-grain solar and battery sensors.
- Tesla Wall Connector - Integrates with Tesla Wall Connector / Charger. All communication is done locally with your devices.
If you have Tesla Solar, I recommend you use the Powerwall Integration so that your communication is done locally and you get all the extra detail. You can install all the Tesla integrations at the same time if you want to connect your Solar, Cars, and chargers.
Configure Energy Dashboard
Dashboard Configuration is under Settings > Dashboards > Energy
The following lists which sensor you should use for the various Dashboard energy settings.
For Tesla Powerwall/Solar
- Electric Grid
- Grid consumption: My Home Site import (sensor.my_home_site_import)
- Return to grid: My Home Site export (sensor.my_home_site_export)
- Grid consumption: My Home Site import (sensor.my_home_site_import)
- Solar Panels
- Solar production: My Home Solar export (sensor.my_home_solar_export)
- Home battery storage
- Battery systems
- Energy going in to the battery: My Home Battery import(sensor.my_home_battery_import)
- Energy coming out of the battery: My Home Battery export (sensor.my_home_battery_export)
- Note: If you have multiple powerwalls you can either configure them as a single battery (shown above) or add them as separate batteries. Don't add both the summary and the individual battery or you'll be double counting. Try out both ways and see which you prefer on the dashboard.
- Battery systems
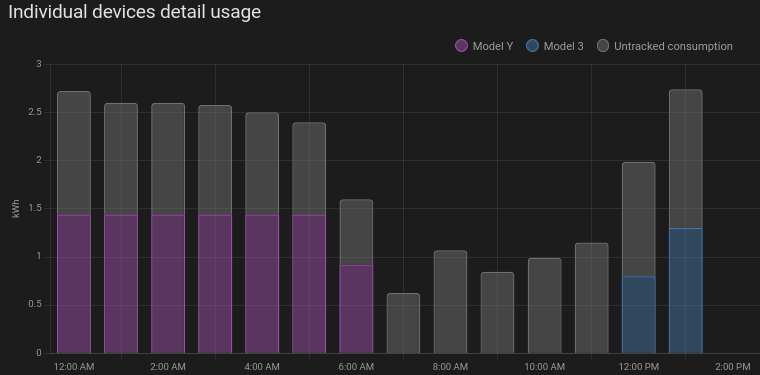
For Tesla Vehicles
- Individual Devices
- Devices: [Car Name] Charge energy added (sensor.charge_energy_added)
- Devices: [Car Name] Charge energy added (sensor.charge_energy_added)
Energy Dashboard Screenshot Examples
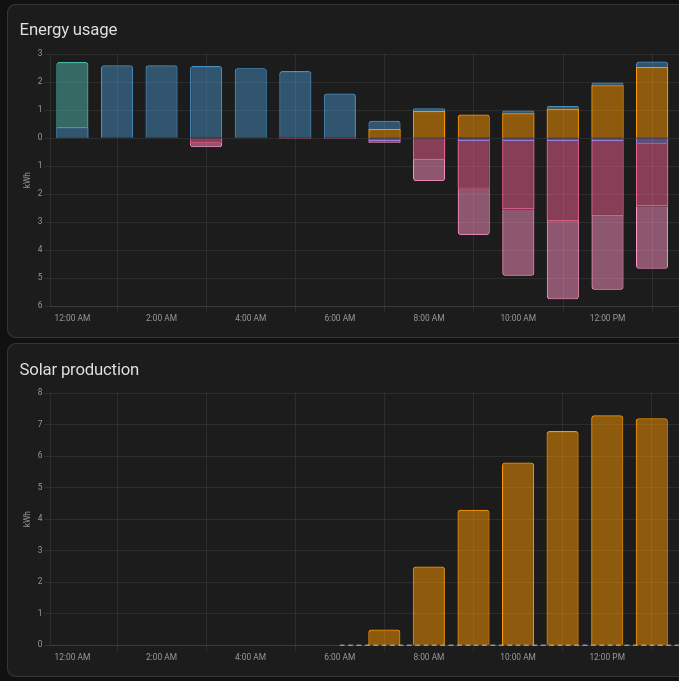
Note: The Energy distribution diagram shows total daily power (hence the kWh unit) and not instantaneous usage like the Tesla App does.
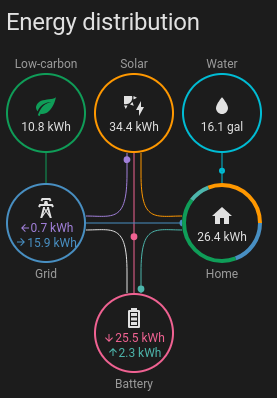
To get the "Low-carbon" indication, you also need to configure your "Grid carbon footprint" setting under "Electricity grid" in the Energy dashboard settings. This requires setting up an API key with the free "Electricity Maps" service available within Home Assistant.
Midea AC
The default Midea integration does not support most common Midea devices. To support common Midea M-Smart devices like Air conditioners, Fans, Water heaters, Washers, etc you will need to install a HACS addon (See Enable HACS if you don't have/know about that first).
Unfortunately the main "Midea AC Lan" add-on is broken and appears abandoned by the initial developer (a common problems with HACS addons). However there are a few forks which have continued development and fixed issues. The most well supported fork I have found is: https://github.com/wuwentao/midea_ac_lan
To install
Note: If install fails, make sure you did not select the other "Midea AC Lan" in HACS. It has more downloads listed, but is also broken.
Advanced Setup
Covering more advanced setup topics as I learn them
433 MHz Devices
Why 433 MHz?
While Wifi, Zigbee, Z-wave, and Matter/Thread are great, sometimes you just need a simple sensor that does one thing really cheaply. 433MHz devices (and others like 915MHz and 868MHz) are one-way sensors that can talk to Home Assistant to report things like temperature, water, moisture, open/close and much more.
The advantages of these devices are:
- They are cheap
- They are everywhere
- They have extremely long battery life
- They have decent range
- You might already have some
- The communication protocols are simple and reliable, no device pairing needed
The downsides are:
- You need a special receiver, called an SDR (Software Defined Radio)
- Sensors can sometimes require more configuration
- It can be difficult to determine which devices are supported
- Not everything listed as 433MHz can be used
- Setting up your SDR receiver takes more steps, but this guide will show you how
And as either a downside or an upside depending on your view is that you might learn a lot about your neighbors.
Equipment
SDR receiver
The most important thing you will need is a SDR receiver. This is a USB device with an antenna which can receive radio signals and pass them to your HA device.
I purchased the Nooelec NESDR Mini 2+ as an entry level device for under $40, but there are a range of devices of all prices out there. Just do a quick search to ensure it works with Home Assistant. If the Mini 2+ isn't on sale, the regular NESDR Mini 2 is great too. Any device using a Realtek chip should work. Other companies make chips, but these are very affordable ones. You'll often see the term rtl referenced, which stands for Realtek Limited (Examples: rtl-srd, rtl-433).
Sensors
You're going to want something to sense. Here are some good suggestions to start with, but as you get comfortable, search around for more device types as you can do so much with SDR!
- Temperature/Humidity:
- Water/Leak:
- Motion Detection:
- Still investigating
- Soil Moisture:
Remember how I mentioned learning about your neighbors? Chances are that you and your neighbors already have some devices transmitting on 433MHz. Before I ever turned on my first sensor, my alarm system door sensors and my neighbors soil sensors both popped up in Home Assistant! Car TPMS (Tire Pressure Monitoring Systems) also show up, but because you likely don't want to have a dashboard filled with every car that drives by these are disabled by the default config below.
† These devices I have not tested myself, but my neighbors must be using them because I've picked up their signal and have been able to read them.
Setting Up Your SDR Receiver
Your receiver has arrived, let's set it up! If your sensor has arrived too, great! If it hasn't lets set the receiver up anyway and see what we find.
Note: If you want to play with the SDR receiver on your linux desktop/laptop first, see my guide here: https://www.wswapps.com/books/debian-ubuntu-pop-os/page/install-configure-sdr-receiver
Add-on Installation
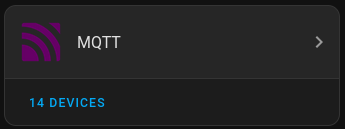
- From HA, go to Settings > Devices & Services > Add Integration > MQTT
-

- All your future devices will show up under this MQTT service
-
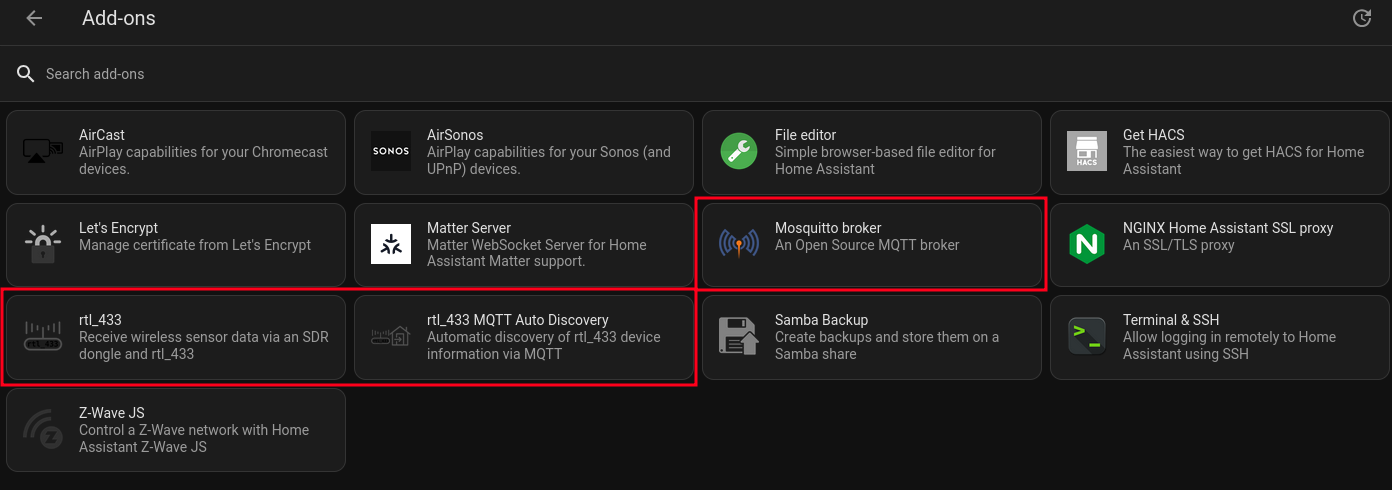
- Next, go to Settings > Add-ons > Add-on Store. Select and install: Mosquito broker
- Start Mosquito Broker
- No configuration is needed
- This add-on is necessary to take in the detected sensors/messages and publish them to Home Assistant as devices and sensors
- No configuration is needed
- Also from the Add-on store, select the 3-Dot Menu > Repositories and Add the following:
https://github.com/pbkhrv/rtl_433-hass-addons- This new repository contains the repos we need to use the SDR receiver
- Install both of the following Add-ons now and start them:
- rtl_433
- rtl_433 MQTT Auto Discovery
- You can remove/disable this later if you prefer, but it will make getting started a lot easier. This add-on will auto-detect nearby devices and add them to HA MQTT automatically

Add-On Configuration
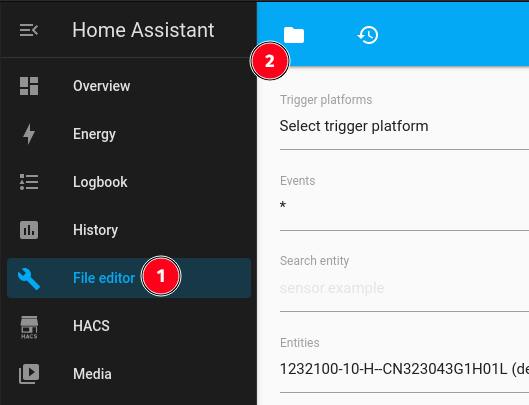
We're almost done. We now need to create a configuration file for rtl_433. To do that you need a way to upload or edit files in Home Assistant. If you have a favorite way, use that. For this demo I will use the File Editor which you can install from the Add-on section. make sure to enable "Show in sidebar" for the File Editor after installing and starting it.
- From the File Editor menu option, click the folder icon at the top
-
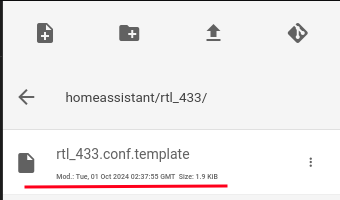
- Click on the rtl_433 folder and then click on the file named: rtl_433.conf.template
-
- The default config file will be displayed. We will just make a few changes and I'll post the full file below in case that's easier:
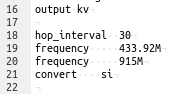
- Remove the
#beforeoutput kv- This will enable you to see pretty logs on the rtl_433 Add-on of anything it detects.
- Add the following new lines (anywhere, but I recommend just after the output kv line):
frequency 433.92Mconvert si- Those lines set the frequency to 433Mhz devices and ensure that measurement units are standardized. Optional but recommended.
- Remove the
- The rest of the file can remain as-is. It configures passing the data to MQTT and disables any Tire Pressure sensors that are detected.
- Click the Save icon at the top tos ave your changes.
- The full file at the end should look like this:
rtl_433.conf.template
# This is an empty template for configuring rtl_433. mqtt information will be
# automatically added. Create multiple files ending in '.conf.template' to
# manage multiple rtl_433 radios, being sure to set the 'device' setting. The
# device must be set before mqtt output lines.
# https://github.com/merbanan/rtl_433/blob/master/conf/rtl_433.example.conf

output mqtt://${host}:${port},user=${username},pass=${password},retain=${retain}
report_meta time:iso:usec:tz

# To keep the same topics when switching between the normal and edge versions,
# use this output line instead.
# output mqtt://${host}:${port},user=${username},pass=${password},retain=${retain},devices=rtl_433/9b13b3f4-rtl433/devices[/type][/model][/subtype][/channel][/id],events=rtl_433/9b13b3f4-rtl433/events,states=rtl_433/9b13b3f4-rtl433/states

# Uncomment the following line to also enable the default "table" output to the
# addon logs.
output kv

frequency     433.92M
convert    si


# Disable TPMS sensors by default. These can cause an overwhelming number of
# devices and entities to show up in Home Assistant.
# This list is generated by running:
# rtl_433 -R help 2>&1 | grep -i tpms | sd '.*\[(\d+)\].*' 'protocol -/run.sh'
#    [59]  Steelmate TPMS
#    [60]  Schrader TPMS
#    [82]  Citroen TPMS
#    [88]  Toyota TPMS
#    [89]  Ford TPMS
#    [90]  Renault TPMS
#    [95]  Schrader TPMS EG53MA4, PA66GF35
#    [110]  PMV-107J (Toyota) TPMS
#    [123]* Jansite TPMS Model TY02S
#    [140]  Elantra2012 TPMS
#    [156]  Abarth 124 Spider TPMS
#    [168]  Schrader TPMS SMD3MA4 (Subaru)
#    [180]  Jansite TPMS Model Solar
#    [186]  Hyundai TPMS (VDO)
#    [201]  Unbranded SolarTPMS for trucks
#    [203]  Porsche Boxster/Cayman TPMS
protocol -59
protocol -60
protocol -82
protocol -88
protocol -89
protocol -90
protocol -95
protocol -110
protocol -123
protocol -140
protocol -156
protocol -168
protocol -180
protocol -186
protocol -201
protocol -203- As you learn more, you can update this config file. This example config file shows lots of good options that can be configured
- Later on we'll edit this config file to listen to more than one frequency in case you have devices on other frequencies.
- Go back to Settings > Add-ons, select rtl_433 and restart it.
- Check the Log tab and you should see your SDR receiver detected. Let it run for a few minutes and refresh the logs to see if it detects anything. It may not if you aren't nearby any sensors.
This setup process will automatically detect new sensors and add them to the MQTT integration within HA. There will not be a notification of a new device, they will just show up and you can Disable them if you don't want them. If you find too many devices are showing up, you can disable the rtl_433 MQTT Auto Discovery Add-on. Down below we'll discuss adding a sensor manually if needed.
Configure a Sensor
If you have the rtl_433 MQTT Auto Discovery Add-on enabled, you don't need to do anything. Any commonly recognized devices will show up automatically in the MQTT integration for you to begin using. If you aren't using Auto Discovery or your devices is not one that can be auto discovered, it can be manually configured.
TODO: documentation on manually configuring a sensor
Monitor Multiple Frequencies
To monitor multiple frequencies, you need to update your rtl_433.conf.template file.
- Add the following two lines, then Save the file:
hop_interval 30frequency 915M
- Example:
-
- Restart the rtl_433 Add-on.
The hop_interval defines how many seconds each frequency will be scanned, before hopping to the next. If you want one frequency scanned more than another, you can list the same frequency multiple times.
The downside of this is that there is a period of time where you are not scanning each frequency and can miss messages. To scan each frequency without missing anything you would need to get an additional SDR receiver per frequency and configure multiple config files. This guide doesn't cover that setup (yet).
More Info
Here is a collection of resources and guides I used to help me get started with SDR and 433Mhz in Home Assistant:
- https://community.home-assistant.io/t/home-assistant-add-on-rtl-433-with-mqtt-auto-discovery/260665
- https://static.xtremeownage.com/blog/2021/433mhz-automation/#installing-rtl_433
- https://www.reddit.com/r/homeassistant/comments/10pkerb/i_have_no_idea_how_to_use_rtl_433/
- https://www.youtube.com/watch?v=_COwsvkxyFA
Frigate NVR
The goal with a Network Video Recorder (NVR) is to free yourself from cloud subscriptions for security cameras. You can (and probably should) run a standalone NVR, but in this guide we'll setup Frigate NVR as a Home Assistant Add-On.
Equipment
To run an NVR alongside Home Assistant you will likely need more CPU power than a Raspberry Pi provides, but most mini PCs should have enough. You can always try it out and find out.
If you plan to use any detection features at all (object tracking, notifications for specific objects) then you will need some sort of hardware acceleration. The Google Coral USB Accelerator device is recommended and is what we'll cover in this guide.
The Frigate recommended hardware guide has more details on both hardware acceleration and CPU recommendations.
Cameras
See list of cameras I've tested at the bottom
You will need cameras that support RTSP and optionally ONVIF. ONVIF is needed for PTC cameras if you want Frigate to be able to control their movement. You also ideally want cameras that can output 2 streams, 1 high and 1 low resolution. High resolution will be used for viewing and the lower resolution for detection tasks.
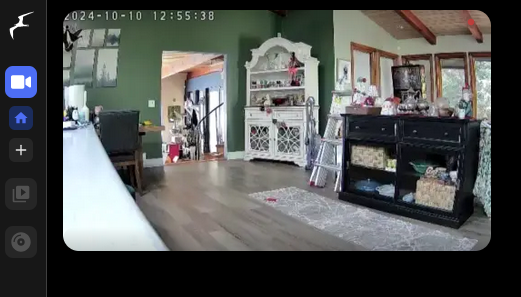
In this guide I will be using a Tapo C210 camera which can sometimes be found on sale under $20 and supports Pan & Tilt as well as 2K resolution. Tapo cameras support RTSP and ONVIF as well as 2 different quality streams. Unfortunately they also require the Tapo app to perform the initial setup. I will be searching for other cameras that can be used entirely offline in the future and update this guide.
Setup Cameras
The first step is to setup your cameras and enable RTSP. This will vary based on the brand.
- Be sure to set a secure random username and password for your cameras when enabling RTSP
- In your router, reserve the camera's IP address so that it won't change on you. Do not expose the camera to the internet.
- Test your camera's RTSP stream in something like VLC. The exact string will differ based on the brand, but common examples are:
- Tapo:
rtsp://username:password192.168.0.101:554/stream1
- Using
stream2will load the low quality 360p or 720p stream.
- Using
- Tapo:
- Make sure your RTSP stream is working before moving forward
Install Frigate
- In HA go to Settings > Add-Ons > Add-On Store
- In the upper right click the 3 dots, select Repositories.
- Enter
https://github.com/blakeblackshear/frigate-hass-addonsand click Add
- Enter
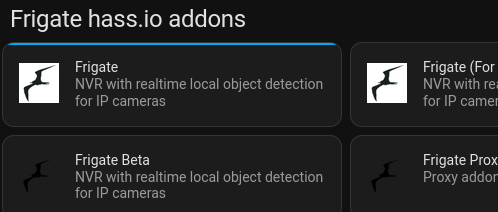
- Now under the Frigate haas.io addons section, select Frigate and click Install
-

- Frigate (Full Access) is another option that can be used if the regular Frigate is not able to properly connect to your devices. It is not recommended unless absolutely needed since it has unrestricted access to your computer. Install the regular Frigate for now and you can always install Full Access later without requiring any additional configuration. Unfortunately they are not clear about exactly what reasons the Full Access version may be needed for.
-
- Enable the Start on boot, Watchdog, and Show in sidebar options.
- Click Start to start Frigate
Add-On Configuration
We now need to update the configuration file for Frigate to tell it about any cameras. To do that you need a way to upload or edit files in Home Assistant. If you have a favorite way, use that. For this demo I will use the File Editor built into Frigate itself.
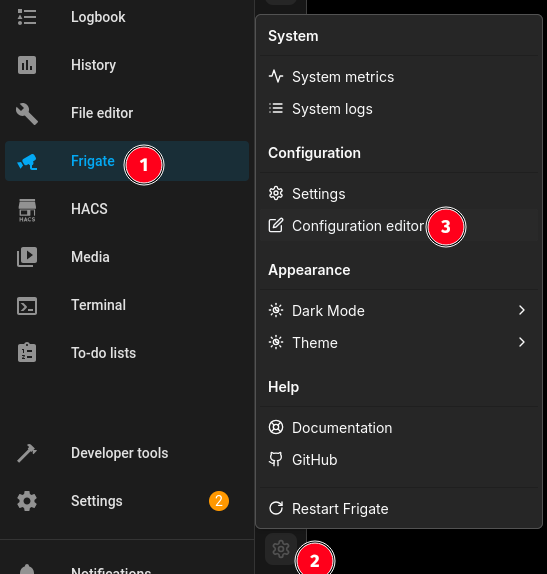
- From the Frigate menu option, click the gear icon at the bottom of the page and then select Configuration editor
-
- The default Frigate config file will be displayed in YAML format. We need to add our first camera to it.
- Under the cameras: section lets add our camera:
Expand to see frigate.yaml
Keep any code above and below the cameras section that is already in the config file
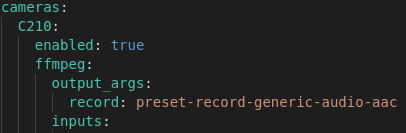
cameras:
  C210: # <------ Name your camera
    enabled: true
    ffmpeg:
      inputs:
        - path: rtsp://username:password@192.168.0.101:554/stream1 # The High Quality stream you want to use for recording
          roles:
            - record
        - path: rtsp://username:password@192.168.0.101:554/stream2 # The Lower Quality stream you want to use for detection
          roles:
            - detect
    detect:
      enabled: false # Disable until you have a working camera feed and hardware acceleration
      width: 1280 # The resolution of the detection camera feed.
      height: 720
      fps: 5 # This can be raised later if we have the processing power
    record:
      enabled: false
      retain:
        days: 7 # The number of days a recording will be kept for after a motion is detected
        mode: motion
      events:
        retain:
          default: 30 # The event data will be kept for 1 day. After this period, the event data will be automatically deleted.
          mode: motion
# Leave out this section if camera is not PTZ or does not support ONVIF
    onvif:
      host: 192.168.0.101
      port: 2020 # Port may differ for your camera brand!
      user: username
      password: password
      autotracking:
        enabled: false # Disable until you have hardware acceleration
        calibrate_on_startup: true
        zooming: disabled # Can enable if camera supports Zoom
        track:
          - person

    objects:
      track:
        - person
        - car
- Click the Save & Restart button
-
- If Frigate fails to restart due to an error in your configuration file, in HA go to: Settings > Add-Ons > Frigate > Log to see the error message. Be very careful about your file formatting and spacing. Indentation and whitespaces matter in YML files.
- Going back to Frigate from the HA side menu, you should now see your camera feed. Clicking the camera feed opens it in full view and If you enabled ONVIF will also show your PTZ controls
-

Additional Setup and usage instructions are coming soon. In the meantime go ahead and setup more cameras and play around with Frigate. You can try enabling detection in your Frigate config file, but without Hardware acceleration it may bring everything to a grinding halt.
Using go2rtc - Viewing High Quality Streams
Wait, you setup the high quality camera stream in your Frigate config, but when viewing it from the web UI you're seeing a low resolution stream!?
While this setup is optional, it will allow for viewing higher quality streams in the Frigate UI and also reduce the number of direct concurrent connections to your cameras. This also allows for more connection types to cameras than just RTSP. You can see the full list of supported connection types here.
Open your frigate.yaml file again for some editing. We are going to add a new main section titled go2rtc: and also add the cameras to this section, then we will update the cameras: section to point to this stream instead of directly to the camera.
Expand to see frigate.yaml
Add the following section right above the existing cameras: section. If using rtsp, you can copy the rtsp connection string from the cameras section to this section.
go2rtc:
  streams:
    C210: # <-- Name the camera, use the same name as in the cameras section
      - rtsp://username:password@192.168.0.101:554/stream1 # <-- stream which supports video & aac audio
      - "ffmpeg:C210#audio=opus" # <-- Optional, This creates a copy of the stream which transcodes audio to opus for webrtc support
    C210_sub: # <-- Optional low-quality substream
      - rtsp://username:password@192.168.0.101:554/stream2 # <-- Low Quality stream which supports video & aac audio
      - "ffmpeg:C210_sub#audio=aac" # <-- Optional if audio is desired in aac format for substream
If you have issues with the rtsp connection string, you can try adding ffmpeg: to the start of it. This supports more encoding types, but does cause the camera connection to be slower. Example: ffmpeg:rtsp://username:password@192.168.0.101:554/stream1
Save the changes to this file and restart Frigate to test this stream and see if it works.
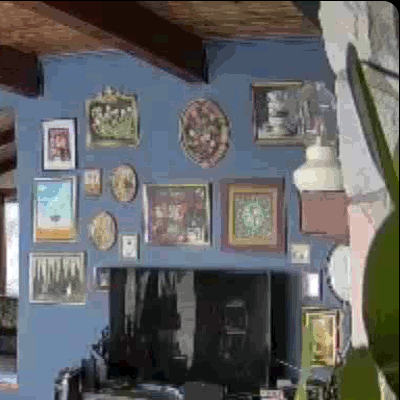
Below is an example of quality difference when viewed in the Frigate UI before and after enabling go2rtc. This is just one corner of the camera view and there is quality lost from converting this to a gif for display here, but it still makes the quality difference clear.
You must now change the path: element for each camera under the cameras: section to point to the go2rtc stream instead of directly to the camera. This will again reduce the number of connections made directly to the camera. No credentials need to be specified here. Example: - path: rtsp://127.0.0.1:8554/C210
You should also add the following setting under the path to tell Frigate to always use this re-stream coming from go2rtc: input_args: preset-rtsp-restream
More go2rtc docs: https://docs.frigate.video/guides/configuring_go2rtc/
Notifications & MQTT Integration
Now that Frigate is installed and working, you'll need to install the Frigate HACS integration to integrate it with the rest of Home Assistant. If you have not yet enabled HACS, see here first. This also assumes you have already installed the MQTT Add-On and Integration. If not, see here.
- From HACS, search Frigate
- Download Frigate and Frigate Card. Then restart Home Assistant
-
- In HA, go to Settings > Devices & Services > Add Integration > Frigate
- Leave the default URL in place (
http://ccab4aaf-frigate:5000) and click Submit- The default URL works if you've install Frigate as an Add-On in Home Assistant. If you have installed Frigate elsewhere, you need to enter the URL/IP to access it here.
- Your configured camera(s) should pop up so you can add them to an Area.
- Go to Settings > Add-ons > Mosquitto broker > Configuration
- If you haven't setup a user here yet, add one using this format in the Logins field
- Setting whatever username and password you want. This user is only for applications to access MQTT and Frigate requires a user to exist, it cannot use MQTT unauthenticated like some other services can.
-
- username: mqtt-user password: mqtt-pwd - Click Save to save your new MQTT user
- Open your
frigate.yamlfile again for more editing. We are going to edit the section titledmqtt:so that Frigate can access MQTT. If the mqtt section is missing you can add it.
Expand to see frigate.yaml
The mqtt section is usually at the very top of the frigate.yml file and is disabled by default. Enable it as shown here and add your Home Assistant server's local IP address as well as the user and password you just setup in the MQTT Mosquitto broker config.
mqtt:
  enabled: true
  host: 192.168.1.100 # <-- Local IP of your HA server. Does not work with localhost/
  port: 1883
  user: mqtt-user
password: mqtt-pwd- Save the changes to this file and restart the Frigate Add-on
- Go to Settings > Devices & Services > Frigate, and select one of your cameras.
- You should now see a bunch of Sensors available.
- If MQTT is not working, these sensors will show unavailable. If that's the case, check the Frigate logs (Settings > Add-Ons > Frigate > Log) and search for anything referencing
mqtt. Also make sure Frigate was restarted after the latest changes. Make sure the host value you entered in frigate.yml is correct and is the IP address and not something likelocalhostorhomeassistant.localas those won't work.
- If MQTT is not working, these sensors will show unavailable. If that's the case, check the Frigate logs (Settings > Add-Ons > Frigate > Log) and search for anything referencing
- You should now see a bunch of Sensors available.
- Now you need to import this blueprint which will allow you to finally setup notifications:
- To setup a notification rule after importing this blueprint: Go to Settings > Automations & Scenes > Create Automation > Frigate Notifications
- As a basic notification example, Select a camera and a device to be notified.
- If not devices show up, make sure you've installed the Home Assistant phone app and logged in with it
- If your device shows up twice, it's probably the last one listed, but you may need to try and come back and change it if it doesn't work.
- For Base URL, you can start by leaving it blank. A value of
homeassistant://will open links in the app but not work for TVs. Setting your public home assistant URL will open links in a browser, but will work for TVs. - No other fields are required. You can come back later to customize your notifications further or setup additional notifications for other devices/groups.
- Click Save and name your notification. It is now active. You can find it in the Settings > Automations & scenes page.
- Try walking in front or your camera and see if it triggers.
- If it does not trigger there are a few things to check:
- Check frigate.yml and make sure you have the
detect:element under your camera enabled. - Check the Frigate Review page to see if it's detecting events. If it's not, it's a camera config issue.
- Open your camera in Frigate and make sure Detection is enabled there. This option seems to work separately from the frigate.yml setting, and both need to be enabled.
- Make sure the correct device is selected in the Automation you just setup
- Check frigate.yml and make sure you have the
- If it does not trigger there are a few things to check:
Motion Tracking
Coming Soon, detailed instructions on setting up motion tracking and other features
Cameras Tested
| Camera Brand |
Model |
Features |
Substream |
Works? |
Notes |
| Tapo | Cheap |
Internet Required for Setup Not all models have same substream quality Muting audio in Tapo app will Mute the RTSP steam audio in Frigate |
|||
| Tapo | C210 |
2k, Pan & Tilt |
360P | ✓ |
Internet Required for Setup P&T work in Frigate w/ manual controls but not automatic tracking.
Note: some other Tapo models have a better 720p substream. |
| Tapo |
C110 / C120 |
2k, Cheap |
360P | ✓ |
Internet Required for Setup. C120 has better performance and clarity. I recommend it.
Note: some other Tapo models have a better 720p substream. |
| Reolink | Cheap |
360P |
✓ |
Substream quality lower than ideal for object detection. Some models may have higher substream resolution. RTSP sometimes unstable Untested, but supports RTMP and may be more reliable |
|
| Eufy | X |
X |
No longer supports RTSP. Eufy pulled RTSP from cameras previously supporting it via a firmware update. Some models may still support RTSP, but it's a gamble. |
||
| Wyze |
Cheap |
360P |
X |
No RTSP Support. Hacky workaround available but it's not super reliable |
What is a substream?
A sub-stream is a secondary camera stream at a lower resolution. Without a substream, object detection needs to happen on the main stream, which can take a lot of resources of it is high quality. However, if the substream resolution is too low then it's not very useful. Usually 720p is a good middle ground. If you have the resources to perform detection on the full resolution stream, go for it!
Common Issues
No Audio
Getting audio working can sometimes be a bit of Trial an Error. The latest versions of Frigate improve this.
- Try removing the ffmpeg audio from the got2rtc setting entirely
- Try Adding/Removing the ffmpeg output_args under the camera as well:
-

- Generally if you enable ffmpeg audio=aac in to got2rtc settings you should enable this under the camera as well. And when disabled/removed from go2rtc, remove it from the camera settings too.
-
Devices Missing in Settings > Devices & Services > Frigate
The Frigate Devices don't update automatically until Home Assistant has been restarted. The most reliable way to get this updated is:
- Restart Frigate
- Restart Home Assistant
If you don't restart just Frigate first, then it won't pick up the Frigate config changes in time to update the Device list.
Changing Camera Names
Changing camera names in Frigate is a bit difficult as you need to update all the references manually. Note, the connection to the Frigate Camera Devices in Home Assistant will break and new devices will be created. These are the steps you need to take:
- Update ALL references to the camera name (and any sub-stream names) in your frigate.yml file
- Restart Frigate and wait for everything to load back up
- Verify in the Frigate UI that all cameras are loading and the settings show the new camera names
- Restart Home Assistant
- Yes, do this
- After Home Assistant is back up, go to: Settings > Devices & Services > Frigate
- Verify that all the new names are displaying and the old ones are gone
- Go to Settings > Automations & scenes
- Manually update (and Save) every automation or scene that references your cameras so reference the new name
ESP Device Flashing Issues
If you are having difficulties flashing your ESP based device following any of the many online tutorials (I used this one), try these common solutions.
ESP Device Not Entering Flash Mode
First, don't expect any lights to come on when your device enters flash mode. So no lights may be a good thing.
Verify the device has power by powering it from your USB Serial device without holding down power first. It should light up if it gets power.
When booting into flash mode:
- Do not have your ESP device plugged into the wall!
- Start with the USB serial device unplugged
- Ensure all connections are correct and you're using 3 or 3.3 V power (not 5V)
- Press and hold the ESP device power button
- Plug in the USB still holding the ESP device power button
- Hold for up to 12 seconds (but usually 3 seconds is enough)
- Attempt to connect and flash your device
USB Device Not Showing Up - Linux
In linux the USB to serial driver should be installed by default, no install needed. However if your kernel has been updated without a reboot it can cause this driver to not work.
You might see error messages like this: failed to validate module [usbserial] BTF: -22
The solution to this one is simple, just reboot.
Failed to open serial port - Linux
If you receive this error message while flashing: Failed to execute 'open' on 'SerialPort': Failed to open serial port.
The brltty config may be stealing the USB connection. BRLTTY is for supporting braille displays for the blind. If you do not use brial displays you can safely disable this config permanently. To do so, we link the config file to /dev/null like so:
sudo ln -sf /dev/null /etc/udev/rules.d/85-brltty.rules
You then need to restart.
Switch TX and RX
Your USB serial and ESP device should generally have TX and RX crossed. For example the USB serial devices Transmits and the ESP device receives. Some ESP devices have their TX and RX reversed, so try matching TX to TX and RX to RX to see if that solves your problem
Tesla Fleet Setup
Instructions for setting up the Tesla Fleet integration in Home Assistant. This is an advanced setup process (for now).
- Sign in with your Tesla Account credentials and create a new app. Give it a unique name to ensure no one else has used the same name:
- In the Tesla app setting, set the Redirect URL to:
https://my.home-assistant.io/redirect/oauth - For the Allowed Origin(s) setting you need a public domain where you can host a file. Hopefully soon we can simplify this step.
- Update: You can use https://fleetkey.cc/ if you don't have your own domain.
- When asked, select all available scopes.
- Generate a Public/Private Key Pair. See below:
- Linux Instructions, run these commands:
openssl ecparam -name prime256v1 -genkey -noout -out private-key.pemopenssl ec -in private-key.pem -pubout -out public-key.pem
- You now have two files: private-key.pem and public-key.pem which you'll need later
- You must place the public key on the Allowed Origins domain you specified at the following location:
- https://your-domain.com/.well-known/appspecific/com.tesla.3p.public-key.pem
- Linux Instructions, run these commands:
- Using Postman or a similar app, we need to make some API calls to Tesla now.
- Here is a Postman collection you can import: Tesla Fleet.postman_collection.json
- For the Tesla Auth Token call, fill in your client_id and client_secret from your Tesla Developer account, then click Send in postman.
- This assumes Tesla North America or Asia-Pacific. If you're in a different region like Europe, find your URL here and update the audience field: https://developer.tesla.com/docs/fleet-api/getting-started/base-urls
- You'll get back a response with an access_token in quotes. Copy the value in the quotes.
- Now open the Tesla Partner Account in postman. Go to the Authorization tab and enter it into the Token field.
- Click the Body tab and in the quotes next to domain enter the same domain you entered in Allowed Origin(s) when you setup your app with Tesla (excluding the https:// portion).
- Remember, you must place the public key you created on the Allowed Origins domain you specified at the following location:
- https://your-domain.com/.well-known/appspecific/com.tesla.3p.public-key.pem
- Remember, you must place the public key you created on the Allowed Origins domain you specified at the following location:
- Send the request in postman. If your file was in the correct place, you should get back a response. Otherwise you'll receive an error message with what went wrong.
- Create new Application Credentials in your HA: https://my.home-assistant.io/redirect/application_credentials/
- Select Tesla Fleet as the Integration and Enter your app name, client_id, client_secret, then click Add
- Reconnect the device in HA Settings > Devices & services > Tesla Fleet
Common Errors:
- If you get the error "We don't recognize this redirect_uri. Please use the redirect_uri found in your app details."
- In your Tesla Developer app settings, you may have swapped the "Redirect" and "Returned" URLs. It should look like this:

- In your Tesla Developer app settings, you may have swapped the "Redirect" and "Returned" URLs. It should look like this:
- If you get the error "A condition has not been met to process the request" here are the most likely reasons:
- If you're in Europe of China, repeat steps 7 - 11 again, but change the audience field the one of the other ones listed in step 7.
- Your public key file may not be properly hosted and available.
- Your Client ID or Client Secret may be wrong in the Home Assistant Application Credentials. Double check them and remove/re-add them if needed.

Notes:
- This guide does not yet cover Command Signing which may be required by newer vehicles to perform actions. It is not required just to read stats: https://www.home-assistant.io/integrations/tesla_fleet#command-signing
- Each public key and Allowed Origin URL can only be used once. It cannot be shared with other Tesla apps.
Lady Catterton's Automated Cat Alert System
 Lady Catterton isn't allowed outside, but she doesn't let that stop her from keeping a close eye on the neighborhood cats that pass by. Here's how she does it completely locally.
Lady Catterton runs Home Assistant OS on a spare HP Mini PC. You can read about how she set it up here: https://www.wswapps.com/books/home-assistant/page/setup-home-assistant-on-a-mini-pc
Lady Catterton runs Frigate NVR as an addon in HAOS to monitor her local cameras and detect objects. You can read about her setup here: https://www.wswapps.com/books/home-assistant/page/frigate-nvr
And finally, Lady Catteron has configured some automations in Home Assistant to let you know any time she spots a fellow kitty. Below is an example of how she does that. She prefers to post to Mastodon, but you can post your important news anywhere. Maybe one day she'll get more creative with her words as well. Kitten steps.
This automation config looks for cat events coming from Frigate on a specific camera only after the event has ended, to ensure we only post about it once. After posting, we delay for 5 minutes to ensure that we don't get too excited and post again right away.
alias: Mastodon - Back Door Cat
description: Posts to Mastodon with cat image when Frigate detects a cat
triggers:
  - trigger: mqtt
    topic: frigate/events
    payload: end
    value_template: "{{ value_json.type }}"
conditions:
  - condition: template
    value_template: >-
      {{ trigger.payload_json.after.label == 'cat' and trigger.payload_json.type
      == 'end' and trigger.payload_json.after.camera == 'Back_Door' }}
    enabled: true
actions:
  - variables:
      source_filename: >-
        {{ trigger.payload_json.after.camera }}-{{ trigger.payload_json.after.id
        }}.jpg
    enabled: true
  - delay: "00:00:03"
  - data:
      config_entry_id: MASTODON_ACCOUNT_ID_ASSIGNED_BY_HA_HERE
      visibility: unlisted
      status: >-
        A 🐱 just came by the back door!

        #cat #homeassistant #frigate

      media_description: >-
        I'm {{ (trigger.payload_json.after.score * 100) | round(1) }}% sure this
        is a cat!
      media_warning: false
      media: /media/frigate/clips/{{ source_filename }}
    action: mastodon.post
  - delay: "00:05:00"
mode: single
Randomize messages
We can randomize the posted messages a bit by defining a yaml file with a list of possible messages to be picked at random. For example, here are some of the intros which are then embedded into the status field when she posts:
cat_intro.yaml
>
  {{ [
    "Oh Boy!",
    "Here kitty kitty.",
    "Great Scott!",
    "A visitor has arrived!",
    "Mrrrp.",
    "*Slow Blink*",
    "Look!"
  ] | random }}
Now you can add this file as a variable in your automation:
  - variables:
      source_filename: '{{ trigger.payload_json.after.camera }}-{{ trigger.payload_json.after.id
        }}.jpg'
      cat_intro: !include /config/cat_intro.yaml
And put {{ cat_intro }} in your message anywhere you want one of those random values to appear.
Important Note:
The automation UI in Home Assistant does NOT support these file includes. You must create a new file and manage them in code.
Create a file name like automations_advanced.yaml and place this automation in there instead. Now inside your main configuration.yaml file you can add the following lines to load both the UI based automations and the ones in your custom file:
automation: !include automations.yaml
# automations that use !include and cannot be configured in the UI
automation yaml: !include automations_advanced.yaml
This custom automation file will still be visible in the UI with the rest of your automations, but you will only be able to edit them by editing the automations_advanced.yaml file directly.