Setup
- Setup Home Assistant on a Mini PC
- Enable HACS - Home Assistant Community Store
- Home Assistant Dynamic DNS & SSL
Setup Home Assistant on a Mini PC
NOTE: You will need a dedicated computer to rune Home Assistant. There are other options available, but most of them require a new device. It's possible to use VirtualBox or VMware, but there are big limitations with that so I would only recommend it for trying things out. I found it easier to just dive in fully.
After investigating several options, I decided the easiest route to start out with Home Assistant was to purchase a cheap Mini PC and install HAOS on it directly, without a Hypervisor.
Finding a cheap Mini PC
I browsed https://lowcostminipcs.com/ which is a site that links to good Mini PC deals on eBay. Almost any will do, but I splurged and payed $74 for an HP Elitedesk. If you just want the basics and don't want to set anything up, you can get a Home Assistant Green device, I just knew I could get a lot more computer for a lot less price.
Installing HAOS on a Mini PC
The installation instructions Home Assistant provides for a Generic x86-64 are pretty good. If you've ever installed linux from a Live CD before then it's nothing too complicated. A few things to watch out for though:
- HAOS does not provide a live ISO for installing. You must create an Ubuntu Live USB device and then once in the Ubuntu trial environment you download the HAOS image and use Ubuntu to write that image to your disk. A little odd but it works
- You may need to modify your BIOS boot order and disable Secure Boot.
- Your computer probably won't boot after following the directions. There's a step they hide at the end to create the EFI boot entry. If you follow their instructions step-by-step you'll have to boot back into Ubuntu live mode just to run one more command.
- Once installed, you need ethernet on your first boot, but you don't need a monitor on your first boot. HAOS does a great job of launching a web interface automatically and immediately with everything you need, so don't worry about lugging a monitor around after the initial install.
- I installed HAOS over wifi where my monitors were and then moved it to my router where the ethernet was for the first boot and didn't need to bring a monitor.
Backups
One of the first things you should do is enable backups and have them copied off of your device. You'll want to think about where you can send them too. One popular option is an add-on to send them to Google Drive. In my case I have a network share available over Samba/SMB that I can send them to. Connecting to a Samba share no longer requires any add-ons, you can add it directly from Settings > System > Storage > Add Network Storage.
In Settings > System > Backups select the 3-dot menu in the upper right and select Change default backup location to change the backups to use your network share instead of being saved locally. Create a backup and check it. Unfortunately you cannot specify a sub-folder to place the backup in, so if you want it in a folder you may have to do some trickery to do that. For me, I can create a Samba share that goes straight to the desired folder.
Scheduling backups is easy in Settings > System > Backups.
Over time I will need to watch the space needed by the backups as I've heard they can grow quite large. I've also heard that the Visual Studio Code Add-on can cause backups to grow quite large, so avoiding that may be one solution.
Enable HACS - Home Assistant Community Store
Many devices you may want to control are not supported by the default included Home Assistant install. When searching online for how to connect a device with search terms like "Home Assistant [Your Device]" you will find Github repos with installation instructions. Most of these use HACS to install them, so you'll need to install HACS first.
Don't be dumb like me and try to install HACS add-ons through the native Home Assistant Add-on page. Install HACS first!
Installing HACS
Follow the most recent instructions provided by HACS: https://www.hacs.xyz/docs/use/
In summary, this will include:
- Adding the HACS Add-On Store in Settings > Add-ons within Home Assistant.
- Checking the Settings > System > Logs > Get HACS for any messages about additional manual steps (I had none)
- Restarting Home Assistant in Settings > System and press the power icon in the upper right.
- Adding the HACS Service under Settings > Devices & Services
Once installed, HACS will appear in the main Home Assistant Side menu.
Installing HACS Integrations
WARNING: HACS addons are generally not as stable as official ones. Many are abandoned & broken already, or may break over time. Go to the integration's Github Repo to report any issues or ask any questions. Also check if they are still actively maintained.
From the HACS option in the side-menu, you can browse and find additional devices/services that are supported or add the repository URL for any you find online not listed.
Some GitHub repos even provide a link that will route you straight to your Home Assistant install and add the integration when clicked.
Once an integration is Downloaded/Installed, you set it up through the usual Settings > Devices & Services page just like a native integration.
I found that after first installing HACS and downloading some custom integrations, adding them from the Devices & Services page was not working. The integration seemed to just load forever with a "Please wait, starting configuration wizard" message. Home Assistant does not provide any way to back out of this menu, so you may need to just close the app/webpage and reload it to try again. I left it for the night and in the morning had no issues. If you have this issue after any HACS integrations, just give it some time and come back to try again. A restart of Home Assistant did not resolve the issue as the restart was blocked by whatever process is being slow behind the scenes.
Home Assistant Dynamic DNS & SSL
There are numerous reasons to get an SSL certificate for your Home Assistant environment, particularly if you plan on allowing any external access.
Dynamic DNS is also extremely useful for external access so you can have a consistent domain name to use to access your HA environment even when your local ISP changes your IP address.
Dynamic DNS
For most people, I would recommend using the existing Duck DNS Add-On found in Settings > Add-Ons. In my case, I already have a separate Dynamic DNS setup for my home network. Rather than getting a SSL certificate for that DDNS provider I instead used an existing domain I own like this:
- Setup a CNAME record from newsubdomain.mywebsite.com to mysubdomain.ddnsprovider.com
SSL - Lets Encrypt
Add the Lets Encrypt Add-on found in Settings > Add-Ons.
Fill out the Configuration information using the DNS challenge. You can use the http challenge if you expose your install's port to the web, but I didn't want to do that yet so DNS was a better option. You will need to read the add-ons documentation in detail to get your configuration correct. Depending on your DNS provider you need to enter different settings, and I found the Documentation to be incorrect in places.
The short version is:
- Fill out your domain and email address
- In my case, the domain would be: newsubdomain.mywebsite.com
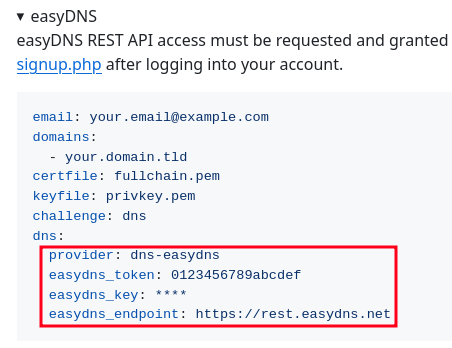
- Find your DNS provider in the Example Configurations section of the Add-on Docs.
- Do not use the "DNS providers" section downdown for this, some of the settings are incorrect/missing.
- Copy the settings under the "dns" section and paste those into your HA add-on configuration page. Example:
-
- Search for how to get any required credentials for your specific DNS provider. Fill in those fields.
- Save the Configuration page.
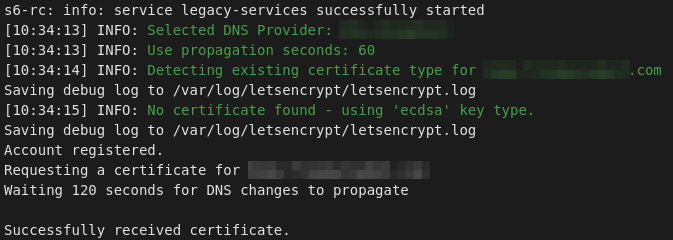
- Go to the Info page of the Add-on. and click Start.
- The Add-on will begin trying to get your SSL certificate. Switch to the Log tab to to see if it was successful or if there were any errors. It may take several minutes, there's a refresh button at the bottom to reload get any new logs.