Debian: Ubuntu, Pop!_OS
Guides for debian based distros
Install & Configure SDR receiver
This guide specifically is for the Nooelec NESDR Mini 2+ USB RTL-SDR and ADS-B Receiver Set in a Debian or Ubuntu based environment, but should work for other similar SDR receivers (Especially Realtek ones).
- Plug in your SDR receiver to USB
- Run command:
lsusb | grep DVB- If there are no results, make sure the USB device is plugged into a working USB port.
- Note down the two 4-digit values separated by a colon. This is the Vendor ID and Device ID of your SDR receiver. I will use the ones shown in this screenshot for this guide, but use your own values if they differ:
- Open/Create the following file (as root): /etc/modprobe.d/blacklist-dvb.conf
- Add the line:
blacklist dvb_usb_rtl28xxu
- The tildes here represent the end of the file and are not actually part of the file.
- Save and close the file
- This will block the default driver that is installed for this device. That driver does not work for general SDR purposes
- Install the rtl-sdr package:
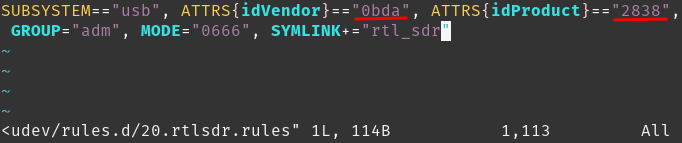
sudo apt install rtl-sdr - Open/Create the following file (as root): /etc/udev/rules.d/20.rtlsdr.rules
- Add the line:
SUBSYSTEM=="usb", ATTRS{idVendor}=="0bda", ATTRS{idProduct}=="2838", GROUP="adm", MODE="0666", SYMLINK+="rtl_sdr"- Ensure the Vendor and Device/Product IDs match the ones from before. You can run the command "lsusb | grep DVB" again if you forgot to write them down.

- Save and close the file
- Add your user to the adm user group so that it has permission to access the device. In the command below change the end to your ubuntu username:
sudo usermod -a -G adm william
- Unplug your USB device and then run this command to load the new rule:
sudo udevadm control --reload-rules
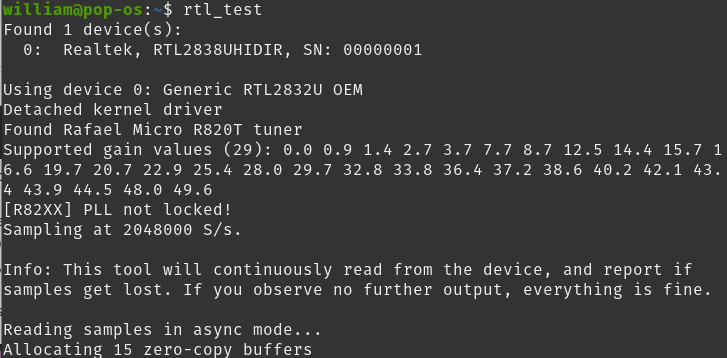
- Plug your USB device back in and run this command to test it:
rtl_test- It should look something like this and not list any errors. If there are errors try running as root. If it works as root that means your user doesn't have proper permissions or the udev rules file is incorrect. Try those steps again.

- If all is working the process will keep running with no further output. You can use Ctrl-C to stop the process now.
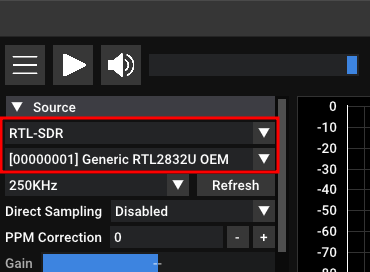
- If you have an SDR program (like SDR++), open it and see if you can access the device
- You may need to change the Device type to RTL-SDR before your device is displayed

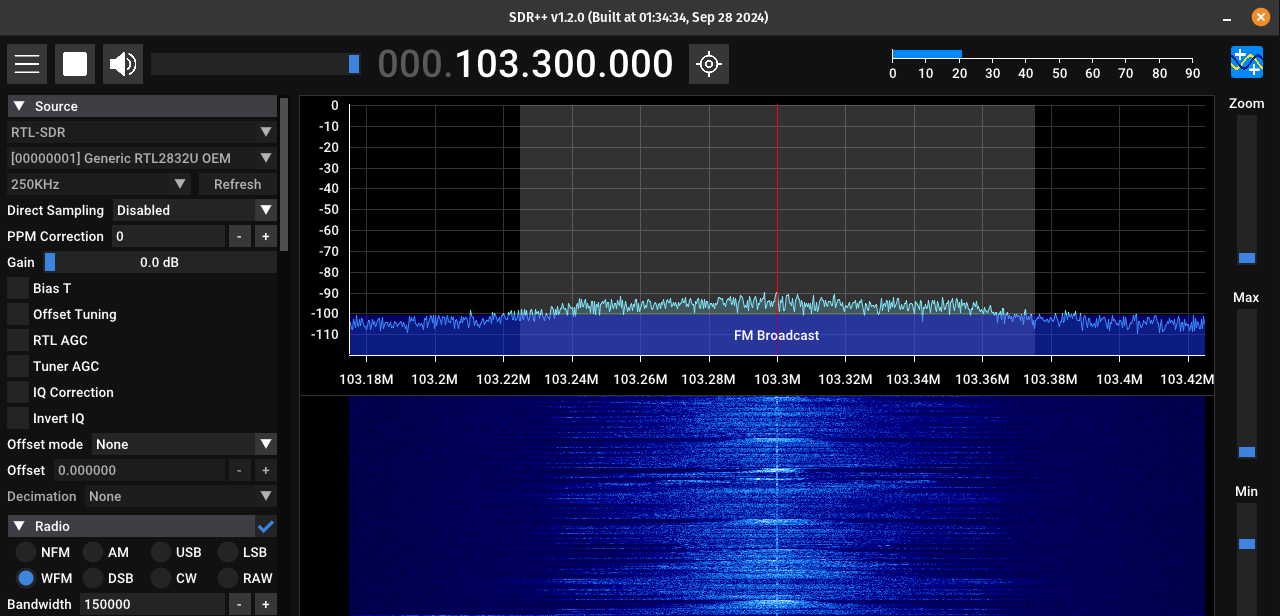
- A good first test is to tune to a local radio station
- Congrats! Now it's time to start listening to some stuff
- If you're looking to decode messages from nearby devices you'll likely want rtl-433 as well:
sudo apt install rtl-433


Issues
rtl_test Errors
If you receive a "Failed to open rtlsdr device #0" error when running the rtl_test command, something is already accessing your USB SDR receiver. Close any applications that might be using it and try again. If you're not sure what application is using it, try unplugging your device and plugging it in again.
If you receive any gibberish characters for the device name, this likely means there is a permissions issue. Try again as root and review the instructions for setting up the udev rules/permissions.
SDR++ app not displaying/receiving
For me, SDR++ sometimes does not start receiving properly. Sometimes it does. I've not found a solution for this and I've not had this issue in other applications, so the only solution I currently have is to use a different app.
Mounting Network shares with fstab
Auto Mounting a Network SMB or CIFS Drive
As always, backup your working fstab first:sudo cp /etc/fstab /etc/fstab.bak
The following is a way to automatically mount a network share without the risk of it blocking you computer from booting. This is useful for non-critical drives such as media or backups. Review the params before saving your fstab file, you may need to adjust some!
In this example we will mount the SMB share photos to the local directory /mnt/photos. Replace with your shared drive and preferred local folder.
- Create the directory your drive will mount to. This can be owned by any user: EG. root
sudo mkdir /mnt/photos
- Add the mount as a new line to /etc/fstab
//IP_ADDRESS/photos /mnt/photos cifs vers=3.0,nofail,noauto,x-systemd.automount,username=USERNAME,password=PASSWORD,uid=1000,gid=1000,dir_mode=0777,file_mode=0666 0 0- Read the explanation below before continuing to save!
- Make sure you didn't make a mistake. Validate your fstab file changes with:
sudo findmnt --verify --verbose
- Tell the system to re-load the fstab changes with:
systemctl daemon-reload- Because the example here sets
noauto, you cannot mount them with the "mount -a" command
- Usually the network shares will mount automatically once you try and access the local directories. Sometimes this takes a few minutes the first time. You can speed this up with the following command:
sudo systemctl restart local-fs.target
Explanation of line #2:
- //IP_ADDRESS/photos
- IP and name of the network share
- /mnt/photos
- Local folder to mount to
- cifs
- Identifies this as an SMB/CIFS share
- vers=3.0,nofail,noauto,x-systemd.automount,username=USERNAME,password=PASSWORD,uid=1000,gid=1000,dir_mode=0777,file_mode=0666
- vers=3.0 - Optionally identify the version of SMB used to connect. Usually default to 1.0 if not specified. This will depend on your specific network share
- nofail - Don't fail booting if there's an issue with this drive
- Not required here but I like it for extra safety
- noauto - Don't mount this drive automatically at boot or when
mount -ais called - x-systemd.automount - Automatically mount the drive when you attempt to access it using the local directory
- username=,password= - Your SMB user and password go here. Leave these off if there isn't one.
- Instead of placing credentials directly here you can instead put them in a file and reference that file here:
- credentials=/home/[username]/.sharelogin
- Inside the file place the following two lines with your credentials:
username=[username]password=[password]
- Instead of placing credentials directly here you can instead put them in a file and reference that file here:
- uid=1000,gid=1000
- Access controls: User and Group the drive's files and folder should be mounted as. You can look up the ones you want by running
cat /etc/passwdand finding your desired local user. The two numbers shows are the uid and gid in that same order. - I HIGHLY suggest you use IDs and not names here. If you use names they must match EXACTLY on your local machine and on the network share.
- Access controls: User and Group the drive's files and folder should be mounted as. You can look up the ones you want by running
- dir_mode=0777,file_mode=0666
- Set the folder and file permissions to whatever you need/want them to be. The permissions listed here allow EVERYONE to read and write files, but no one to execute them for safety. You may want to lower these permissions if you don't want other users to read/write, or add execute permissions if you want to live dangerously and trust all the files on the share.
- Set the folder and file permissions to whatever you need/want them to be. The permissions listed here allow EVERYONE to read and write files, but no one to execute them for safety. You may want to lower these permissions if you don't want other users to read/write, or add execute permissions if you want to live dangerously and trust all the files on the share.
- vers=3.0 - Optionally identify the version of SMB used to connect. Usually default to 1.0 if not specified. This will depend on your specific network share
- 0 0 - These last two zeros are additional mount params for dump and pass. For our (and most) purposes these can remain zero. We aren't using dump and pass is used for boot order checks, but we aren't mounting these at boot. 0 for both options disables both these features.
Notes:
You may have a different preference about the noauto param preventing mounting a boot time. If you absolutely need your drive to mount first thing and it should hold up booting until it has mounted, you can remove that option. If you want booting to fail entirely if the drive is not available, you can also remove the nofail param.